If you spend a lot of time making challenge locks, repinning locks, or otherwise taking a lot of locks apart, then one of the useful tools you can look at acquiring is a pinning kit. A pinning kit is a rectangular box with different compartments which contain all of the different pins, wafers, springs, circlips, anti-drill pins, and everything else required to modify or make up a lock.
The main source of pinning kits comes from the manufacturers themselves, who construct these kits for the benefit of bench locksmiths. They are then used to create master key systems, repair locks and re-key locks. If you’re looking to buy one, then I am reliably informed that they overwhelmingly split into two price categories:
- Very expensive – for a full kit, with a good stock of all the different pins, springs, wafers, etc, that is neatly organised.
- Very cheap – for kits which have been dropped, and therefore need a lot of time spent sorting to become useful again.
However, today I’m going to recommend a third option, namely, putting your own pinning kit together.
The basic idea is pretty simple – If you’ve got a bit of experience picking locks, and have accumulated a lot of low quality locks, then you can easily put together your own kit by stripping them down, and sorting the parts into your own kit for later use.
This has a couple of advantages;
- Firstly, you can repurpose locks that you can trivially pick and have no value to anyone else either.
- Secondly, you can build your kit very cheaply.
- And finally, you can tailor your pinning kit more closely to your needs as a hobbyist, instead of as a professional bench locksmith.
The Box
If this is the approach you’re going for, then you’ll want to find a good box to store all your pins, wafers, springs and more inside. A good box will be strong enough not to be damaged with lumps of metal moving around inside, durable, and have a good number of solid compartments.
Organiser boxes that are “adjustable”, and use little plastic dividers to define the spaces aren’t much good in my experience, because they allow enough space for wafers and pins to slip underneath the divider when the box is moved around. That’s definitely no good for a pinning kit.
The ideal box would be an empty box which houses small compartments that can be taken out, rearranged, and replaced, that have solid bottoms and no gaps. Colour coding would also be a neat feature. You want a durable material, but also one that’s probably softer than brass, so that you don’t have to worry about your box damaging your parts when you move the box around. Hard plastic is a good choice. I don’t have an organiser box like that though, so I’ll show you what I have, and why I like it.
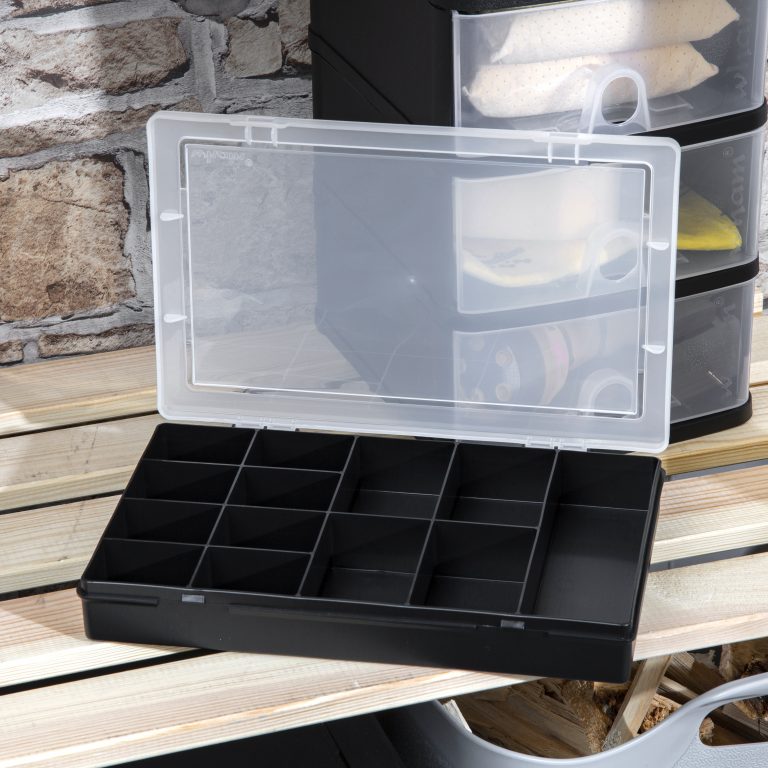
This is the box I use. It has 13 compartments, where the smallest compartments are 55mm by 42mm by 34mm. The compartments are solid, so that the pins can’t slip from one compartment to the next while the box is moving. It’s made of a hard, durable plastic, and has a variety of compartment sizes. This means I can easily accommodate the differently sized bits and bobs that live in my pinning kit.
The Organisation
The next most important aspect to consider is the organisation of your pinning kit.
It’s important to remember that commercial pinning kits are aimed at bench locksmiths. The ideal kits for a bench locksmith are sorted in to the makes/models of locks they work with. Then, they’re sorted into each of the individual pin sizes, so that’s it’s quick and easy to pull out wafers and pins that are the correct length immediately. After all, time is money. So this means that for a lock with 10 cut heights, you’ll often see as many as 17 compartments taken up in their kit only for pins and wafers. They’ll often only need 1 for springs, since those springs will all be the same, and the same for circlips. They also won’t need space for many pinning tools, since those tools will be used across different kits.
By contrast, the hobbyist bench locksmith won’t need a kit that is organised like this. For starters, you probably can’t justify having lots of different kits for all the different brands you encounter. You almost certainly won’t be able to fill them from the locks you’ve got, and they’d take up a lot of room. So, I suggest trying to compact your kit as much as possible. This will cost you more time when you need to use it, but hey, you’re a hobbyist, and this is probably a compromise you need to make. So, to that end, I will share my incredibly inefficient pinning kit layout:

I deal with a lot of pExtra cylinders, or at least, I have in the past. So, I have two compartments dedicated to pExtra/GeGe pins. One is for keypins, and one is for driver pins. I know, this is a horribly inefficient way to sort the pins, since that means I’ll need to measure each of the keypins when I hope to use them. However, this means I can cover all pExtra/GeGe cylinders using only two compartments in my pinning kit. Since I don’t spend a lot of time these days repinning cylinders, I’m happy with this compromise.
Next, I have two more small compartments dedicated to all the rest of the different standard pins I’ve got, from Iseo and ERA, to Yale and ASSA. It’s a mess. The worst part here is not having them sorted by pin diameter. That’s something that’s important to get right when repinning a lock, and so that’s a big disadvantage. However, I need to keep the room, so I can account for the other bits and pieces I need.
I use one small compartment for springs, which includes all the different varieties I’ve come across that are small enough to be used as pin chamber springs. I also commit another compartment for master wafers of any size, as well as the long, thin anti-drill pins, and special pins that fill special slots in locks – like the Schlage Everest check pin. Since this compartment is barely filled, I also use it to store spare cores.
That leaves one compartment for circlips, which again are mixed, and one for all the Bilock parts that I’ve got, including a Bilock core. Since Bilock is rare, but also high security and pinning resources are limited, I find this is a very viable way to store the parts I have. I use a small sealable plastic bag to store the springs seperately from the pins in this compartment to further conserve space.
Two of my medium compartments are filled with Mul-T-Lock Interactive pins. One is used for outer key pins – again with a sealable plastic bag to contain the inner key pins which saves space. The other is used for driver pins, with a small sealable plastic bag for the master wafers and pins. Given the relative emptiness of this compartment, I’ve doubled it up with some 3D printed followers courtesy of Tim Wilkes.
The third medium compartment houses all of the large springs that I have, which can’t be used as pin chamber springs. Instead, these springs are used for things like thumbturns, or in padlocks to push out the shackle. It also houses an S&G 6700 series change key.
The last medium compartment is home to my cylinder shims, padlock shims, cams and couplings. These take up a fair bit of space.
The final, and largest compartment houses my tools – plug followers, circlip removal tool, pinning tweezers, keyblanks, cylinder screws and the like.
Although I suspect most people won’t need to house complex high security pins in their hobbyist kit, I would still recommend the following:
1. Use a large compartment to house your pinning tools. This keeps them where you need to use them. Make it long if you can, instead of wide.
2. Include compartments for big springs, small springs, cams and couplings and thumbturns, circlips and plugs/housings.
3. Sort your pins into two different compartments per manufacturer/model, with one being driver pins, and one being keypins. This means at least you know you’re matching diameter correctly. If you have master wafers, add them to a small sealable plastic bag, and put them in with the driver pins for that manufacturer/model.
4. If you want to double up compartments, double up things which don’t mix. Like springs and circlips. Or plugs and master wafers.
Conclusion
While my own kit is a bit of a mess, and I’m sure my organisational suggestions aren’t optimal, I hope this inspires some of you who have accumulated a lot of old cylinders to have a shot at repurposing them to make your own pinning kit. This should work as a compact starting kit which shouldn’t cost you the earth, especially if you’ve already accumulated a few of the tools and are already stripping down locks and making challenge locks. Give it a shot, and let me know how you get on, what worked, and what didn’t work!
Excellent idea using old locks for building up a kit
Where could one find those cheap pinning kits that were dropped? (other than ebay)
Any cheap kits with only the generic larger sizes that can be filed to the required length?
Thanks!
I’m afraid I don’t have any recommendations for where to look besides Ebay, or getting to know a few bench locksmiths.
Having pins that fit well is pretty important to ensuring the lock doesn’t become a lot easier to attack. Picking is definitely easier, for example, because it makes the tolerances really bad if you’re using undersized pins.
The best I can suggest – although I’m by no means an expert here – is to buy some 3mm diameter round brass rod stock online, and then cut and shape the pins to suit your needs. A junior hacksaw, needle files and some way to hold the pins are all tools you’ll want to look at if you’re interested in shaping the pins yourself. That’s also probably the cheapest and most versatile option.